Showing posts with label boy. Show all posts

Monday, June 4, 2012

Robots


How did you spend your day?

Tuesday, December 13, 2011

Make it Last a Little Longer #2

Most of the children's clothes that get outgrown at our house get passed on to someone else that can use them. These jammies could just not be passed on with the bottoms looking like this.


The other knee looked slightly better.  They seem doomed for the landfill don't they?  Not so! They are salevagable! I've been using this tutorial to turn the shirt and pants into little boy boxer briefs.  I love them!
As you can see, I didn't pay quite enough attention to the tutorial.  I cut out one of the legs on the wrong side of the fabric.  Luckily I had another pair of ripped jammie bottoms in blue so that will be the other leg.  I will aslo use the elastic from the original jammie bottoms for the elastic in the undies.  I had to put this project on hold because I had pressing projects for a birthday and Christmas but there it is.

Tuesday, November 8, 2011

Lollipop Costume

Have you ever seen a lollipop run? We had a fun Halloween.
I sewed the leggings and the lollipop itself. I also used a hot glue gun on the twists to save time. But yes, it did still take longer to make than it was worn.

Monday, September 12, 2011

Hobo Sacks

I used this tutorial to make these Hobo Sacks.
It's a sad day when you can't even find a stick. This boy may just want to take his hobo sack and journey to a land that does have sticks...

Saturday, May 7, 2011

Easter Clothes

Here are the Easter outfits I sewed for the children. I used some of their existing clothes to create patterns and then embellished them.


The pants can be rolled up and secured to the button with a little yellow strap that is on the inside of the pant leg. There is also a hidden button to keep the flaps on the back pocket down.

Tuesday, March 29, 2011

A Birthday Cake for a Grown Up

It was refreshing to just make a cake.  The only requirements were that it was simple.  I like simple...and blue.

Wednesday, March 23, 2011

Upcycled Trash Can Tutorial

I used some trash to make some trash cans. These are for my kids rooms.
I started with an empty container.  This is the Costco size.
I used two pages from a book that has seen better days.  For the Princess Can I used an outdated calendar.
I cut the pages to size.
Luckily a little boy ran through at the exact moment I was lining this up and told me he wanted the Mater side out. I put little pieces of rolled tape behind the four corners.
I placed the other piece of paper on the opposite side.  I also used a small strip from the scraps between each side because they didn't quite cover it.
I put a layer of clear contact paper over that.
That's it.

Thursday, February 3, 2011

Thank Heaven for Little Boys...


There is a little boy that lives at my house.
Oh how I love finding his little boy finishing touches.

Tuesday, February 1, 2011

Faux Chenille Blanket


I had a few days that I wasn't feeling well. It's hard for me to sit and just rest. My mind thinks of lots of things that should be done and my fingers don't like to be still. Luckily, I found a project that helped me stay down - well sitting anyway. This blanket takes some time to make - which was to my advantage. It's not hard but it is a little tedious but oh, it is so beautiful! And, because it gets washed a few times at the end anyway, it didn't matter that I made it while I was sick! Or that I used upcycled fabric. Who can tell after a few washings? - I gave it to my cousin and her new baby. I used a skirt that our grandma wore for one of the layers so of course I told her where the fabric came from. I also used some pieces that were a few large pieces instead of one block of fabric for two of the layers and you can't tell a difference between them and the layers that were full sheets of fabric.

So, I found this project with a complete tutorial at Made. Hop on over there for really beautiful photos and easy to follow, step by step directions. And look at everything else she has to offer. I've spent hours and hours looking at her tutorials and wonderful photos. You won't be disappointed for stopping by!

Thursday, January 27, 2011

Felt Valentines for Boys

I found these beautiful Valentine hair clips and will be making some of these for the little girls in my life.
I really wanted to do do something for the boys that would be similar. This is what I came up with:

Fun right? First I drew a pattern that was football shaped and one that was a circle.

I cut them out.

I used the shapes as a template and cut six football shapes out of brown felt, six circles from orange felt and six circles from white felt.

I found white embroidery floss for the football stitching, red for the baseball stitching and brown for the basketball lines. I really would have used black for the basketball but I didn't have any on hand and who wants to go to the store when there is a project that can be done?

I stitched lines on the baseball as shown.

I doubled back to fill in the holes. I make the stitches across as I went.


I used a double strand of red on the three of each of the colors. -- they may be boys but it is still a valentine... These will be the back side.

I matched a ball front with a heart back and stitched them together with embroidery floss that matched the color of the ball. Be sure to leave about a half inch gap unsewn on the bottom in the center for the pencil.

Do stitching on the footballs and the basketballs in the same manner and you get...


Monday, January 3, 2011

Monster Friends

I made these two guys for Christmas presents for a five year old boy and a three year old boy. We call them Monster Friends. 
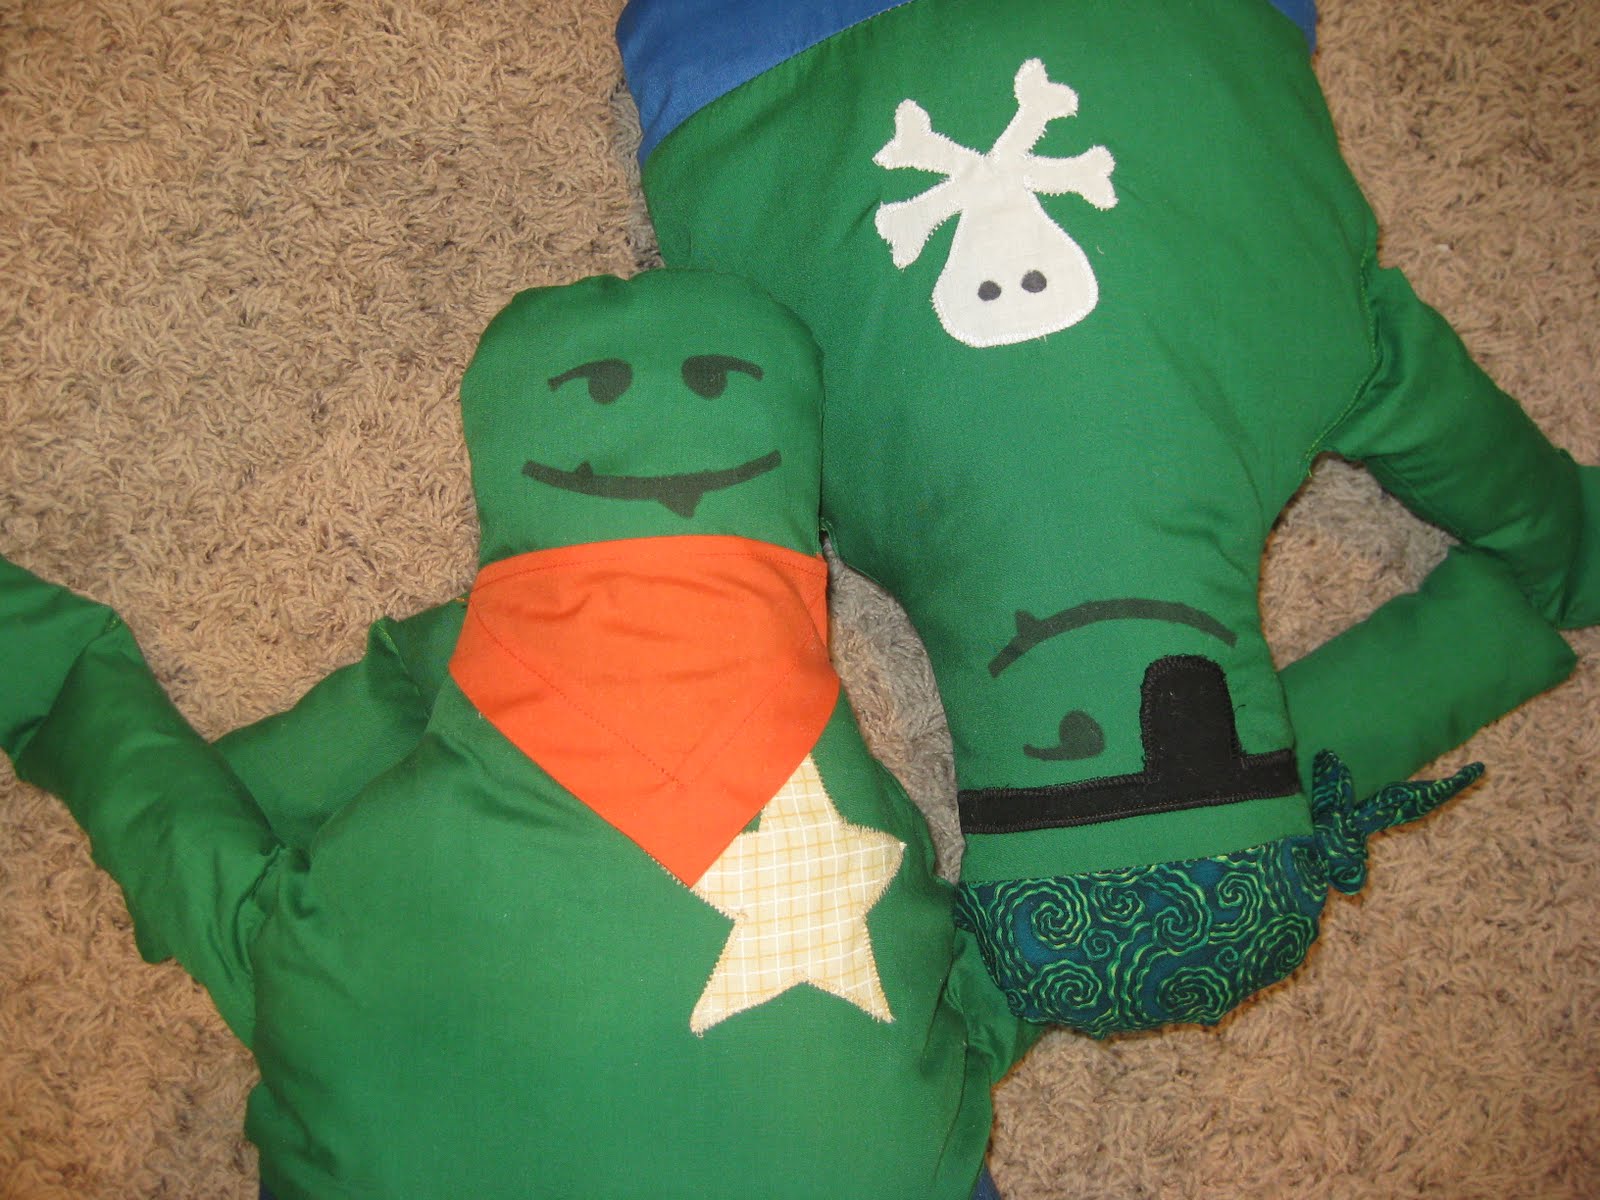
The first one is a Cowboy Monster Friend.


The second is a Pirate Monster Friend and they get along great.